E = I × R. Three letters, one equation. If you sequence it the way Mr Circuit Lab 1201 does across Lessons 14 through 18, a high-school class can move from "I have never heard of Ohm's Law" to "I can pick the right resistor for this LED" inside a single forty-five-minute period.
That sequence matters. The reason most one-day Ohm's Law lessons collapse is that the teacher tries to cover the law, the series formula, the parallel formula, and an LED resistor calculation all at once. Lab 1201 splits those into five short lessons in deliberate order. If you keep that order in the classroom, the resistor calculation at the end of the period is the easiest part of the lesson, not the hardest.
Here is how we run it.
Open with the equation, not the theory
Lesson 14 puts E = I × R on the board and stops there. Voltage in volts, current in amps, resistance in ohms. We do not start with electron flow, we do not start with Ohm's biography, and we do not start with a derivation. The equation goes up first, gets restated three ways — E = I × R, I = E / R, R = E / I — and the student copies all three into their notebook.
Five minutes. That is the entire lecture portion of the period.
Run the numbers on a real circuit
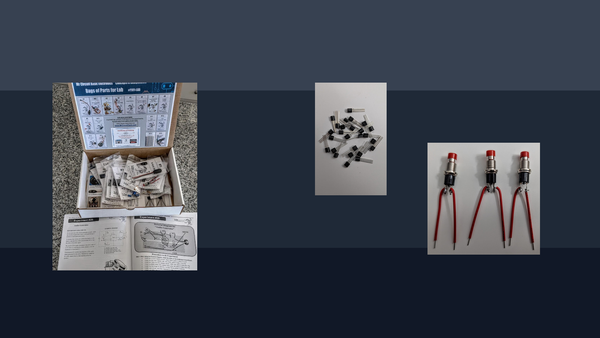
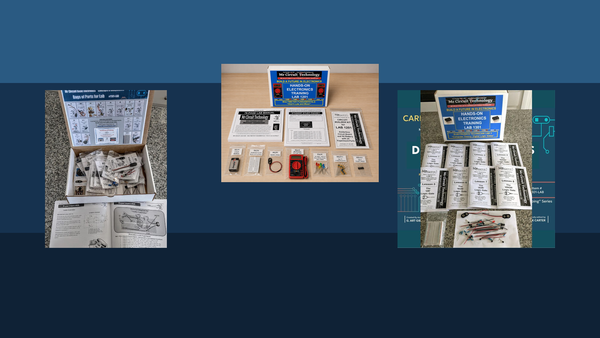
Now switch to the breadboard. Lab 1201 ships a 9V battery, a digital multimeter, and a 14-resistor set running 100Ω to 1MΩ. Have the class build the simplest possible loop: a 9V battery, a 470Ω resistor, and a red LED on the 400-hole solderless circuit board.
Have them predict the current using the equation before they measure. With the full 9V dropped across the 470Ω, the math says about 19 mA. When they put the DMM in line, they will read closer to 15 mA. That gap is not a bug — it is the entry point for Lesson 17.
Do not explain the gap yet. Write the predicted and measured values on the board and move on.
Series, then parallel — back to back
Lessons 15 and 16 are short on purpose. Series adds: R_total = R1 + R2. Parallel uses the product-over-sum form: R_total = (R1 × R2) / (R1 + R2). That is it.
Have each student pick two resistors out of the kit and compute both totals on paper, then check the math with the DMM set to ohms. Two resistors per student, two configurations, two minutes per measurement. Most of the class finishes in under ten. Have them flag any reading that is more than five percent off the calculated value, and they will pretty quickly find the ones who measured across a hand instead of across a resistor.
The LED-drop wrinkle
Now go back to the gap from earlier. Lesson 17 is the one that lands.
Different LEDs do not drop the same voltage. Red, yellow, and green LEDs drop about 2 volts. Blue and clear LEDs drop closer to 3 volts. Lab 1201 ships ten LEDs in those exact five colors precisely so the class can see this. Have the students swap the red LED for a blue one in the same circuit, hit the current setting on the DMM, and watch the reading change.
Now they understand why their predicted current was wrong. The resistor never sees the full 9V — the LED takes its share first, and the resistor only ever sees what is left.
Pick the resistor on purpose
Lesson 18 is the payoff. The formula is R_ADD = E_RES / I_LED, where E_RES is what is left of the supply voltage after the LED drops its share, and I_LED is the current you want flowing through the LED. Pick a 9V supply, a red LED (2V drop, so 7V across the resistor), and a target current of 15 mA. The math gives 7 / 0.015 = 466Ω. The closest standard value in the kit is 470Ω, and that is the resistor they were already holding.
The class period ends with each student calculating a resistor for a different LED color and verifying it with the DMM. They have now done Ohm's Law on paper, in series, in parallel, and with a real component on the bench.
Where to take it next
Lab 1201 keeps going from there. Lessons 25 through 28 walk through 470Ω, 1kΩ, 3.3kΩ, and 6.8kΩ resistors with the same red LED and measured currents of roughly 15.04 mA, 7.40 mA, 2.29 mA, and 1.11 mA. Four ready-made homework problems with the answer key already inside the kit.
The full Lab 1201 — 76-page manual, digital multimeter, solderless circuit board, the 14-resistor set, ten 5mm LEDs, and a 9V battery — is at mrcircuittechnology.com. School purchase orders are welcome. Free tech support for instructors at 805-295-1642 or MrCircuit23@gmail.com.